Currency transactions

You can view currency transaction details (date, purpose, amount, and status), submit a currency transfer or forex transaction application, or provide information for forex controls on the Currency transactions page that you can open from the left-hand menu.
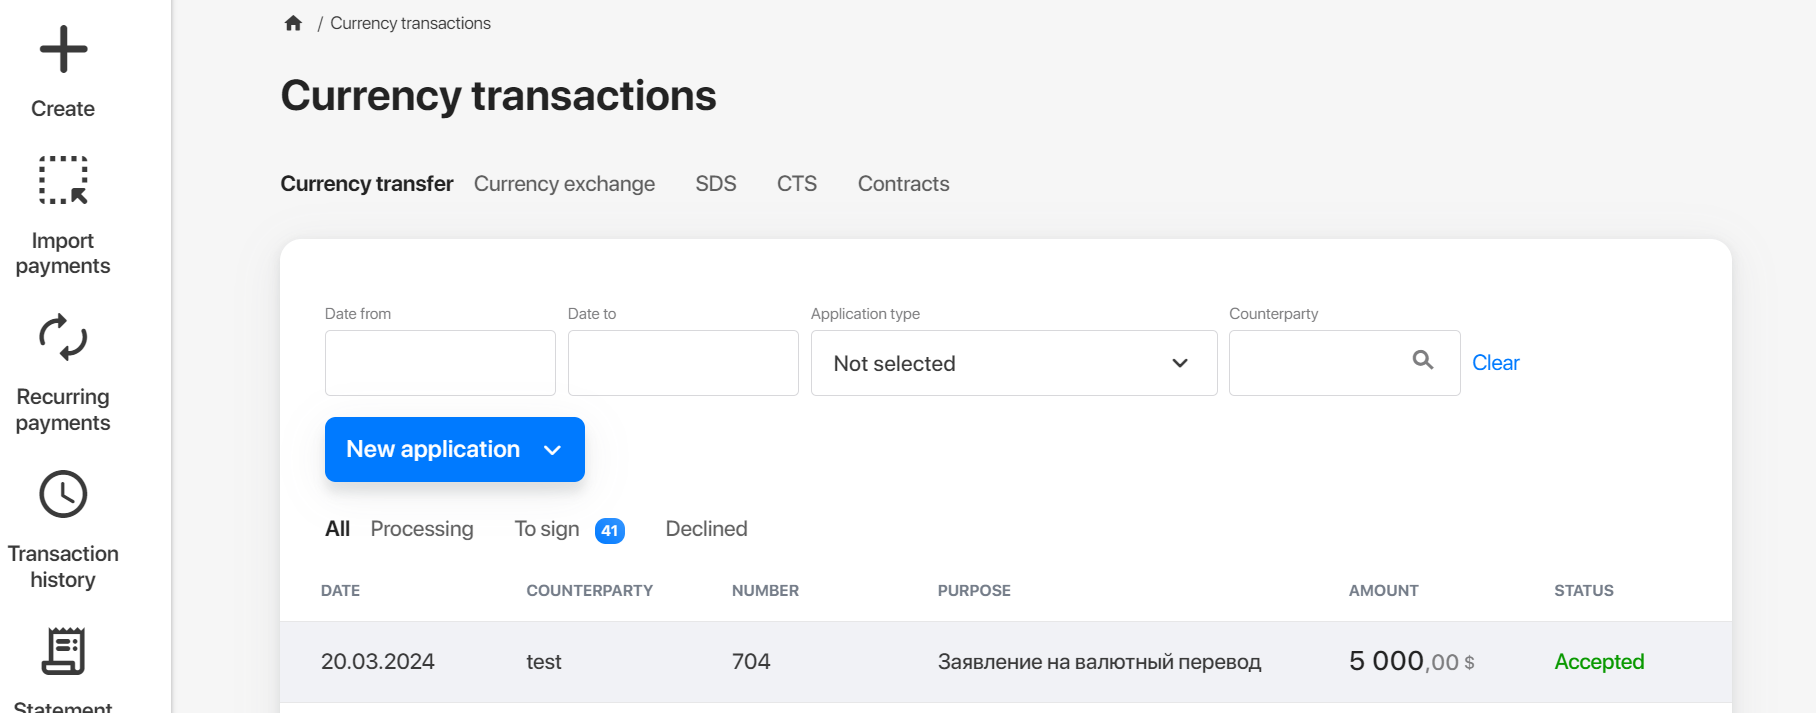
To submit and monitor your applications, go to one of the following tabs:

  • Currency transfer. Orders for debiting funds from a transit currency account, forex transaction applications, or provision of forex transaction info.
  • Currency exchange. Applications for buying or selling currencies.
  • SDS. Applications for generating a Supporting Document Statement (SDS).
  • CTS. Applications for generating a Currency Transaction Statement (CTS).
  • Contracts. Registering or deregistering contracts and loan contracts or making changes to the Section I of the Bank Control Record.

You can filter transactions in each tab by date, type, and status using the dropdown menus and buttons above the table.

Currency transfer

You can send a currency payment from your account if you have enough funds on it.

1. Create a payment

Go to Currency transfer and click New application, then select Currency transfer.

You will see the payment creation form.

2. Fill out the form

  1. Number and Date are specified automatically.

  2. Enter transaction details:

  • Value day. The day when you want your payment to be made.
  • Currency. Use the directory for easy search.
  • Amount.

  1. Specify the sender details:
    • Name and INN in Latin letters.
    • Address. Country, city, and registration address. Use Latin letters.
    • Account from. Select an account from the dropdown list.

  1. Enter the intermediary bank details if they are present in the recipient details:
    • SWIFT. Use the directory for easy search.
    • Name. Specified automatically when you enter the bank SWIFT.
    • Country and Country code. Specified automatically when you enter the bank SWIFT.

  1. Enter the recipient's bank details:
    • SWIFT. Use the directory for easy search.
    • Name. Specified automatically when you enter the bank SWIFT.
    • Country and Country code. Specified automatically when you enter the bank SWIFT.

  1. Enter the recipient details:
    • Name. Use Latin letters.
    • Country and address. Also specify the city here. Use Latin letters.
    • IBAN. Specify if it's mentioned in the recipient's details.
    • Account. Specify if it's mentioned in the recipient's details.

  1. Specify the payment purpose in English. Use the currency transaction code in the following format: {VO\<currency transaction code>} without indentations or spaces.

Note. If the funds are transferred by a resident to their foreign currency account with another bank, specify the name and INN in the payment purpose.

  1. Specify the additional details.

  1. Specify the commission information:

    • Transfer charges. Transaction fee charged by our bank and recipient's bank or intermediary bank. Select one of the following options:

      • OUR. The fee is paid by the payer.
      • BEN. The fee is paid by the beneficiary.
      • SHA. The transfer fees are expected to be shared. One part of the fee will be charged from the payer's account, the other from the recipient's account.
    • Account for charging fees. Select from the dropdown list.

3. Confirm the payment

Check the details and the amount. If everything is correct, enter the code that will be sent to the phone number specified in your contact info

Done! Payment sent.

Debiting a transit currency account

Important: this operation is required to be executed by residents of Russian Federation who receive funds into their transit currency accounts. Once funds transferred into a transit currency account, the resident will be notified by email.

Here's what you need to write off funds from your transit currency account:

  1. Go to Currency transactions > New application.

  1. Click New application and select Debiting a transit currency account.

  2. Fill out the form and click Next.

  1. Check the specified details. A code will be sent to your phone number. Enter it and click Confirm. Click Back if you want to edit the details.

  2. Click Done to finish.

Obligation to sell 80% of forex income

For those Bank customers who are obliged to sell 80% of FX earnings according to the decision of the Central Bank of Russia, there is a dedicated slider. Once activated, it allows to fill out the following fields:

  • Amount. Amount in FX to pay.
  • Receiving account. Account in Rubles to be deposited after FX paid.

Currency exchange

Currency exchange rates are shown with a multiplier. For example: 1 Uzbekistan som = 0.0073549 Russian rubles. With the multiplier of 10 000, the rate will be shown as 73.5490 (10 000 Uzbekistan soms = 73.5490 Russian rubles).

Here's what you need to do to buy or sell currency:

  1. Go to Currency transactions > Currency exchange.
  2. Click Exchange currency.

  1. Fill out the form, then click Next.

  1. Check the specified details. A code will be sent to your phone number. Enter it and click Confirm. Click Back if you want to edit the details.

  1. Click Done to finish or save the document as a PDF file.

Supporting Documents Statement

Important: You are obliged to provide Supporting Document Statement (SDS) only for contracts put under the Bank's control.

How to provide an SDS

To provide an SDS:

  1. Go to Currency transactions > SDS.

  1. Click Create SDS.
  • Specify Number and Date of a new document. The default date is the current date, and the number increases by 1.

  • Click Add.
  • Fill out the form and click Save.

  1. Fill out the form and click Next.

  2. Check the specified details. A code will be sent to your phone number. Enter it and click Confirm. Click Back if you want to edit the details.

  3. Click Done to finish.

How to see the details of a created SDS

To see the details of a creted SDS, find the required statement.

To do this, use the following filters:

  • By date
    Specify a time period in the Date from and Date to filter fields to see the statements created within this period.
  • By counterparty
    Start typing the name of a counterparty into the Counterparty filter field to see all the statements involving this counterparty.

Click the required statement to expand its details.

You can perform the following operations:

  • Repeat the operation.
  • Edit the details (only for statements in the Created status).
  • Sign the document (only for statements in the Created status).
  • Save as a PDF file.
  • Print out.
  • Revoke (only for statements in the Sent to the Bank status).
  • Delete the record (only for statements in the Created status).

Currency Transaction Statement

Important: Residents of Russian Federation are obliged to provide information on transactions that exceed 200,000 Rubles. Also, the Bank has rights to request this Information for certain purposes.

How to fill out a Currency Transaction Statement

To fill out a Currency Transaction Statement:

  1. Go to Currency transactions > CTS.

  1. Click Create CTS.
  2. Fill out the form:
    • Specify Number and Date of a new document. The default date is the current date, and the number increases by 1.

  • Click Add.
  • Fill out the form and click Save.

  • Attach the required documents in PDF, TIFF, JPEG, or PNG and click Next.
  1. Check the specified details. A code will be sent to your phone number. Enter it and click Confirm. Click Back if you want to edit the details;
  2. Click Done to finish.

How to see the details of a currency operation

To see the details of a currency operation, find the required statement.

To do this, use the following filters:

  • By date
    Specify a time period in the Date from and Date to filter fields to see the statements created within this period.
  • By counterparty
    Start typing the name of a counterparty into the Counterparty filter field to see all the statements involving this counterparty.

Click the required statement to expand its details.

You can perform the following operations:

  • Repeat the operation.
  • Edit the details (only for statements in the Created status).
  • Sign the document (only for statements in the Created status).
  • Save as a PDF file.
  • Print out.
  • Revoke (only for statements in the Sent to the Bank status).
  • Delete the record (only for statements in the Created status).